12/27/2010

Create a Limited directory

Create a shared directory that requires user authentication.

[1] Configure Samba 
[root@master ~]#groupadd security
[root@master ~]#mkdir /home/security
[root@master ~]#chgrp security /home/security
[root@master ~]#chmod 2770 /home/security
[root@master ~]#vi /etc/samba/smb.conf
# line 102: change
security =user
# add at the bottom
[Security]                     # specify any name 
path = /home/security
writable = yes
create mode = 0770
directory mode = 0770
share modes = yes
 guest ok = no      #prohibit guest     
valid users = @security   # allow only security group
[root@master ~]#/etc/rc.d/init.d/smb restart  
Shutting down SMB services:[  OK  ]
Shutting down NMB services:[  OK  ]
Starting SMB services:[  OK  ]
Starting NMB services:[  OK  ] 
[root@master ~]#smbpasswd -a cent     # add user 
New SMB password:     # set password
Retype new SMB password:      # verify
Added user cent. 
[root@master ~]#vi /etc/group 
 
security:x:502:cent     # add 
 
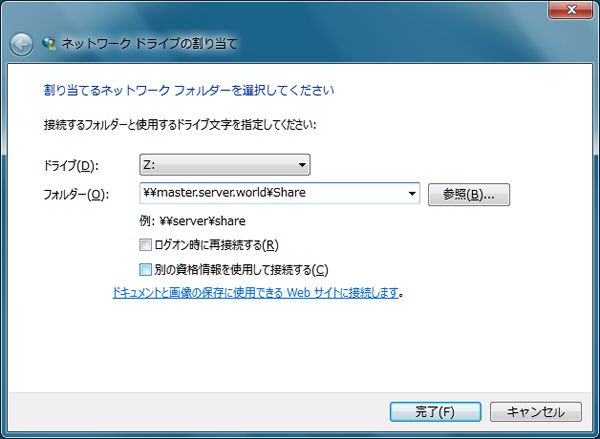
[2] Configure on Windows client. Open [My Computer] -[Map Network Drive] . 


[3] Input shared folder's place. 


[4] Login Password is required. Input it set in section [1]. 


[5] Done to access. 


From (server-world).

12/23/2010

Create Fully accessed directory

Create a shared directory that anybody can read and write, and authentication is not required.
[1] Install Samba
[root@master ~]#yum -y install samba
 
[2] Configure Samba 

[root@master ~]#mkdir /home/share

[root@master ~]#chmod 777 /home/share

[root@master ~]#vi /etc/samba/smb.conf

# line 58: add the lines

unix charset = UTF-8
dos charset = CP932

# line 75: change
workgroup =WORKGROUP

# line 81: uncomment and add IP address you allow

hosts allow = 127.10.0.0.

# line 102: change

security =share

# add at the bottom
[Share]            # any name you like
path = /home/share # shared directory
 writable = yes # OK to write

guest ok = yes # guest OK

guest only = yes # guest only

create mode = 0777 # fully accessed

directory mode = 0777 # fully accessed

share modes = yes # warn if some people access to a file

[root@master ~]# /etc/rc.d/init.d/smb start

Starting SMB services:[  OK  ]

Starting NMB services:[  OK  ]

[root@master ~]#chkconfig smb on

 [3] Configure on Windows client. Open [My Computer] - [Map Network Drive] . 


[4] Input shared folder's place in Folder section and Click 'Finish' button to enter. 


[5] Done to access. 


From (server-world)

12/20/2010

Ubuntu Networking Configuration Using Command Line

The basics for any network based on *nix hosts is the Transport Control Protocol/ Internet Protocol (TCP/IP) combination of three protocols. This combination consists of the Internet Protocol (IP),Transport Control Protocol (TCP), and Universal Datagram Protocol (UDP).
By Default most of the users configure their network card during the installation of Ubuntu. You can however, use the ifconfig command at the shell prompt or Ubuntu’s graphical network configuration tools, such as network-admin, to edit your system’s network device information or to add or remove network devices on your system
Configure Network Interface Using Command-Line
You can configure a network interface from the command line using the networking utilities. You configure your network client hosts with the command line by using commands to change your current settings or by editing a number of system files.
Configuring DHCP address for your network card
If you want to configure DHCP address you need to edit the /etc/network/interfaces and you need to enter the following lines replace eth0 with your network interface card

sudo vi /etc/network/interfaces
# The primary network interface - use DHCP to find our address
auto eth0
iface eth0 inet dhcp

Configuring Static IP address for your network card
If you want to configure Static IP address you need to edit the /etc/network/interfaces and you need to enter the following lines replace eth0 with your network interface card
sudo vi /etc/network/interfaces
# The primary network interface
auto eth0
iface eth0 inet static
address 192.168.3.90
gateway 192.168.3.1
netmask 255.255.255.0
network 192.168.3.0
broadcast 192.168.3.255
After entering all the details you need to restart networking services using the following command
sudo /etc/init.d/networking restart

Setting up Second IP address or Virtual IP address in Ubuntu
If you are a server system administrator or normal user some time you need to assign a second ipaddress to your Ubuntu machine.For this you need to edit the /etc/network/interfaces file and you need to add the following syntax.Below one is the only example you need to chnage according to your ip address settings

sudo vi /etc/network/interfaces
auto eth0:1
iface eth0:1 inet static
address 192.168.1.60
netmask 255.255.255.0
network x.x.x.x
broadcast x.x.x.x
gateway x.x.x.x

You need to enter all the details like address,netmask,network,broadcast and gateways values after entering all the values save this file and you need to restart networking services in debian using the following command to take effect of our new ipaddress.
After entering all the details you need to restart networking services using the following command

sudo /etc/init.d/networking restart

Setting your ubuntu stytem hostname
Setting up your hostname upon a ubuntu installation is very straightforward. You can directly query, or set, the hostname with the hostname command.
As an user you can see your current hostname with
sudo /bin/hostname

Example
To set the hostname directly you can become root and run
sudo /bin/hostname newname

When your system boots it will automatically read the hostname from the file /etc/hostname
If you want to know more about how to setup host name
Setting up DNS
When it comes to DNS setup Ubuntu doesn’t differ from other distributions. You can add hostname and IP addresses to the file /etc/hosts for static lookups.
To cause your machine to consult with a particular server for name lookups you simply add their addresses to /etc/resolv.conf.
For example a machine which should perform lookups from the DNS server at IP address 192.168.3.2 would have a resolv.conf file looking like this
sudo vi /etc/resolv.conf

enter the following details
search test.com
nameserver 192.168.3.2

From (ubuntugeek)

12/16/2010

NTP Server

On server

# yum install ntp
# chkconfig ntpd on
# vi /etc/ntp.conf
add a line
restrict default ignore
restrict 202.54.1.5 mask 255.255.255.245
server 202.54.1.5
(Replace 202.54.1.5 and mask with actual remote ISP or ntp.org NTP server IP. Save and close the file.)
then client configuration
#vi /etc/ntp.conf
add a line like
server <NTP server IP>
restrict <server IP>mask <subnet mask>
#iptables -F
#ntpdate -b <server IP>

Now all is done

12/10/2010

Run with Clamav

[1] Configure SMTP Server in order to scan emails to protect from virus or spams. Install clamav first.
# install from DAG

[root@mail ~]#yum --enablerepo=dag -y install clamd amavisd-new


[root@mail ~]#vi /etc/clamd.conf

# line 72: change

LocalSocket /var/run/clamav/clamd.sock

# line 80: make it comment

#TCPSocket 3310

# line 149: change

AllowSupplementaryGroups yes

[root@mail ~]#vi /etc/amavisd.conf

# line 20: specify domain name

$mydomain= 'server.world';

# line 80: make it comment (not notify if virus detected)
#$virus_admin= "virusalert\@$mydomain";

# line 113: uncomment and specify FQDN

$myhostname= 'mail.server.world';

# line 115,116: uncomment

$notify_method= 'smtp:[127.0.0.1]:10025';

$forward_method= 'smtp:[127.0.0.1]:10025';

# line 118: uncomment thease 4 lines

$final_virus_destiny= D_DISCARD;
$final_banned_destiny= D_BOUNCE;
$final_spam_destiny= D_BOUNCE;
$final_bad_header_destiny= D_PASS;

# line 321: uncomment thease 4 lines

['ClamAV-clamd',  &ask_daemon, ["CONTSCAN {}\n", "/var/run/clamav/clamd.sock"],
  qr/\bOK$/, qr/\bFOUND$/,
  qr/^.*?: (?!Infected Archive)(.*) FOUND$/ ],

[root@mail ~]#vi /etc/postfix/main.cf

# add at the bottom

content_filter=smtp-amavis:[127.0.0.1]:10024

[root@mail ~]#vi /etc/postfix/master.cf

# add at the bottom

smtp-amavis unix -       -       n      -     2 smtp
      -o smtp_data_done_timeout=1200
      -o smtp_send_xforward_command=yes
      -o disable_dns_lookups=yes
127.0.0.1:10025 inet n     -     n     -     - smtpd
      -o content_filter=
      -o local_recipient_maps=
      -o relay_recipient_maps=
      -o smtpd_restriction_classes=
      -o smtpd_client_restrictions=
      -o smtpd_helo_restrictions=
      -o smtpd_sender_restrictions=
      -o smtpd_recipient_restrictions=permit_mynetworks,reject
      -o mynetworks=127.0.0.0/8
      -o strict_rfc821_envelopes=yes
      -o smtpd_error_sleep_time=0
      -o smtpd_soft_error_limit=1001
      -o smtpd_hard_error_limit=1000


[root@mail ~]#/etc/rc.d/init.d/clamd start
Stopping Clam AntiVirus Daemon:[ OK ]
Starting Clam AntiVirus Daemon: Running as user clamav (UID 100, GID 101) [ OK ]
[root@mail ~]#/etc/rc.d/init.d/amavisd start
Starting Mail Virus Scanner (amavisd):[ OK ]
[root@mail ~]#/etc/rc.d/init.d/spamassassin start
Starting spamd:[ OK ]
[root@mail ~]#/etc/rc.d/init.d/postfix restart
Shutting down postfix:[ OK ]
Starting postfix:[ OK ]
[root@mail ~]#chkconfig amavisd on
[root@mail ~]#chkconfig spamassassin on
[root@mail ~]#chkconfig clamd on

These lines below are added in header section of emails after this configuration.
     
from: server-world.info

12/08/2010

Installing Apache2 With PHP5 And MySQL Support On Ubuntu 10.10 (LAMP)

1 Preliminary Note

In this tutorial I use the hostname server1.example.com with the IP address 192.168.0.100. These settings might differ for you, so you have to replace them where appropriate.
I'm running all the steps in this tutorial with root privileges, so make sure you're logged in as root:
sudo su

2 Installing MySQL 5

First we install MySQL 5 like this:
aptitude install mysql-server mysql-client
You will be asked to provide a password for the MySQL root user - this password is valid for the user root@localhost as well as root@server1.example.com, so we don't have to specify a MySQL root password manually later on:
New password for the MySQL "root" user: <-- yourrootsqlpassword
Repeat password for the MySQL "root" user: <-- yourrootsqlpassword

3 Installing Apache2

Apache2 is available as an Ubuntu package, therefore we can install it like this:
aptitude install apache2
Now direct your browser to http://192.168.0.100, and you should see the Apache2 placeholder page (It works!):

Click to enlarge

Apache's default document root is /var/www on Ubuntu, and the configuration file is /etc/apache2/apache2.conf. Additional configurations are stored in subdirectories of the /etc/apache2 directory such as /etc/apache2/mods-enabled (for Apache modules), /etc/apache2/sites-enabled (for virtual hosts), and /etc/apache2/conf.d.

4 Installing PHP5

We can install PHP5 and the Apache PHP5 module as follows:
aptitude install php5 libapache2-mod-php5
We must restart Apache afterwards:
/etc/init.d/apache2 restart
 

5 Testing PHP5 / Getting Details About Your PHP5 Installation

The document root of the default web site is /var/www. We will now create a small PHP file (info.php) in that directory and call it in a browser. The file will display lots of useful details about our PHP installation, such as the installed PHP version.

vi /var/www/info.php
<?php
phpinfo();
?>
Now we call that file in a browser (e.g. http://192.168.0.100/info.php):

Click to enlarge

As you see, PHP5 is working, and it's working through the Apache 2.0 Handler, as shown in the Server API line. If you scroll further down, you will see all modules that are already enabled in PHP5. MySQL is not listed there which means we don't have MySQL support in PHP5 yet.

6 Getting MySQL Support In PHP5

To get MySQL support in PHP, we can install the php5-mysql package. It's a good idea to install some other PHP5 modules as well as you might need them for your applications. You can search for available PHP5 modules like this:
aptitude search php5
Pick the ones you need and install them like this:
aptitude install php5-mysql php5-curl php5-gd php5-idn php-pear php5-imagick php5-imap php5-mcrypt php5-memcache php5-mhash php5-ming php5-ps php5-pspell php5-recode php5-snmp php5-sqlite php5-tidy php5-xmlrpc php5-xsl php5-json
Now restart Apache2:
/etc/init.d/apache2 restart
Now reload http://192.168.0.100/info.php in your browser and scroll down to the modules section again. You should now find lots of new modules there, including the MySQL module:

Click to enlarge


7 phpMyAdmin

phpMyAdmin is a web interface through which you can manage your MySQL databases. It's a good idea to install it:
aptitude install phpmyadmin
You will see the following questions:
Web server to reconfigure automatically: <-- apache2
Configure database for phpmyadmin with dbconfig-common? <-- No
Afterwards, you can access phpMyAdmin under http://192.168.0.100/phpmyadmin/:

12/03/2010

Configuration for NIS client

After building NIS Server, Configure on clients in order to share users' accounts

[root@www ~]# vi /etc/sysconfig/network
NETWORKING=yes
NETWORKING_IPV6=yes
HOSTNAME=www.server-linux.info
GATEWAY=192.168.0.1
# add at the bottom
NISDOMAIN=server-linux.info
[root@www ~]# vi /etc/sysconfig/authconfig
USEWINBINDAUTH=no
USEKERBEROS=no
USESYSNETAUTH=no
FORCESMARTCARD=no
USESMBAUTH=no
USESMARTCARD=no
USELDAPAUTH=no
USELOCAUTHORIZE=no
USEWINBIND=no
USESHADOW=yes
USEDB=no
USEMD5=yes
USEPASSWDQC=no
USELDAP=no
USEHESIOD=no
USECRACKLIB=yes
USENIS= yes
# change
[root@www ~]# vi /etc/yp.conf
# Valid entries are
#
# domain NISDOMAIN server HOSTNAME
#Use server HOSTNAME for the domain NISDOMAIN.
#
# domain NISDOMAIN broadcast
#Use broadcast on the local net for domain NISDOMAIN
#
# domain NISDOMAIN slp
#Query local SLP server for ypserver supporting NISDOMAIN
#
# ypserver HOSTNAME
#Use server HOSTNAME for the local domain. The
#IP-address of server must be listed in /etc/hosts.
#
# broadcast
#If no server for the default domain is specified or
#none of them is rechable, try a broadcast call to
#find a server.
#
# add at the bottom domain server-linux.info server nfs.server-linux.info
[root@www ~]# vi /etc/nsswitch.conf
passwd: files nis # line 33: add
shadow: files nis # add
group: files nis # add
#hosts: db files nisplus nis dns
hosts: files dns nis # add
[root@www ~]# chkconfig ypbind on
[root@www ~]# chkconfig portmap on
[root@www ~]# shutdown -r now

www login: cent   # user name on NIS
Password:     # password
Last login: Sun Mar 11 22:02:12 on tty1
[cent@www ~]$ 
# just logined
[cent@www ~]$ ypwhich
nfs.server-linux.info
[cent@www ~]$ ypcat passwd
cent:x:500:500::/home/cent:/bin/bash
[cent@www ~]$ yppasswd
# change password
Changing NIS account information for cent on nfs.server-linux.info.
Please enter old password:
# current password
Changing NIS password for cent on nfs.server-linux.info.
Please enter new password:       # new password
Please retype new password:
The NIS password has been changed on nfs.server-linux.info.

12/02/2010

Setup easy web development environment (XAMPP)


This is a how-to for setting up a web development environment easily. This guide will install the XAMPP lampp stack into /opt, setup an easy way to start it up and shut it down, and link a folder in your home directory to the webserver.

WARNING
This guide is aimed at a development environment only and should not be used as a public webserver. To setup a public webserver follow the directions on the Ubuntu wiki https://help.ubuntu.com/community/ApacheMySQLPHP

As this is Ubuntu, all the major parts of a typical web server are included (in the main repo, or on the Ubuntu Server CD) and this is a great way to setup a server. The ubuntu developers have prepared a great web server and have made the process as seemless as possible.

But what if even the official way is still to complicated? What if you just want a quick web server for development?

Fortunately there is the XAMPP project: http://www.apachefriends.org/en/xampp.html. The XAMPP project bundles Apache, PHP4 & 5, Perl, mySQL, and a bunch of other utilities/applications into an simple package for Mac OSX, Windows, Solaris, and Linux. Obviously this HOWTO only deals with the linux version.

For those of you with already existing Apache/mySQL/php installations it installs everything into /opt so it doesn't conflict with any other installation, and it is completely setup and ready to run.

Install XAMPP

Two easy steps:
  1. Download the most recent version of XAMPP: (at time of writing 1.5.3a)
    http://prdownloads.sourceforge.net/xampp/xampp-linux-1.5.3a.tar.gz?download
    (Source URL: http://www.apachefriends.org/en/xampp-linux.html#374)
  2. Extract the archive to /opt using sudo: (make sure you are in the directory that you downloaded the archive to)
    sudo tar xvfz xampp-linux-1.5.3a.tar.gz -C /opt

Start XAMPP

To start it up, open a terminal and type this:
sudo /opt/lampp/lampp start
Stop XAMPP

To stop it, open a terminal and type this:
sudo /opt/lampp/lampp stop
Additional XAMPP commands

To see additional commands, open a terminal and type this:
sudo /opt/lampp/lampp
Sweet XAMPP Control Panel


To use the sweet gtk/python control panel:

Run in a terminal:
gedit ~/.local/share/applications/xampp-control-panel.desktop
Paste the following into the open file and save and exit.
[Desktop Entry]
Comment=Start/Stop XAMPP
Name=XAMPP Control Panel
Exec=gksudo "python /opt/lampp/share/xampp-control-panel/xampp-control-panel.py"
Icon[en_CA]=/usr/share/icons/Tango/scalable/devices/network-wired.svg
Encoding=UTF-8
Terminal=false
Name[en_CA]=XAMPP Control Panel
Comment[en_CA]=Start/Stop XAMPP
Type=Application
Icon=/usr/share/icons/Tango/scalable/devices/network-wired.svg
"XAMPP Control Panel" will show up in your applications menu under Internet. Use the Alacarte Menu Editor to move it around.

Test to see if XAMPP is running

Once XAMPP is up and running open firefox and go to: http://localhost/

You should see the XAMPP test page:


Location of files and uploading

XAMPP by default uses /opt/lampp/htdocs as the root web directory. The easiest way to start working on files is to link a folder in your home directory into this directory.
My user name is peter so I have /home/peter/public_html linked to /opt/lampp/htdocs/peter. So if I navigate to http://localhost/peter/ I get a listing of all the files/folders in that directory. (As long is there isn't a index.php/html/etc file)
To set this up, run in a terminal:
  1. Make public_html directory in home directory:
    mkdir ~/public_html
  2. Link to /opt/lampp/htdocs
    sudo ln -s ~/public_html /opt/lampp/htdocs/$USER
Now any files and folders you place in ~/public_html will be published to your personal webserver.

Bookmark http://localhost/username to make this easy to access.

WARNING - SECURITY
http://www.apachefriends.org/en/xampp-linux.html#381
Open holes:
  1. The MySQL administrator (root) has no password.
  2. The MySQL daemon is accessible via network.
  3. ProFTPD uses the password "lampp" for user "nobody".
  4. PhpMyAdmin is accessible via network.
  5. Examples are accessible via network.
  6. MySQL and Apache running under the same user (nobody).
This doesn't leave your whole system wide open, but someone could hack your XAMPP installation, so be wary.
To fix most of the security weaknesses open a terminal and run:
 sudo /opt/lampp/lampp security